The Ultimate Step-by-Step Guide to Creating Your Own Coloring Book for Free
Introduction
Coloring is no longer just a childhood pastime; it has blossomed into a global phenomenon for stress relief and creative expression. But what if you could move beyond the generic patterns found in store-bought books? Imagine a coloring book filled with your own memories, your favorite pets, or specific landscapes you’ve visited. Thanks to innovative platforms like iColoring, creating a professional-quality, personalized coloring book is now entirely possible—and free.
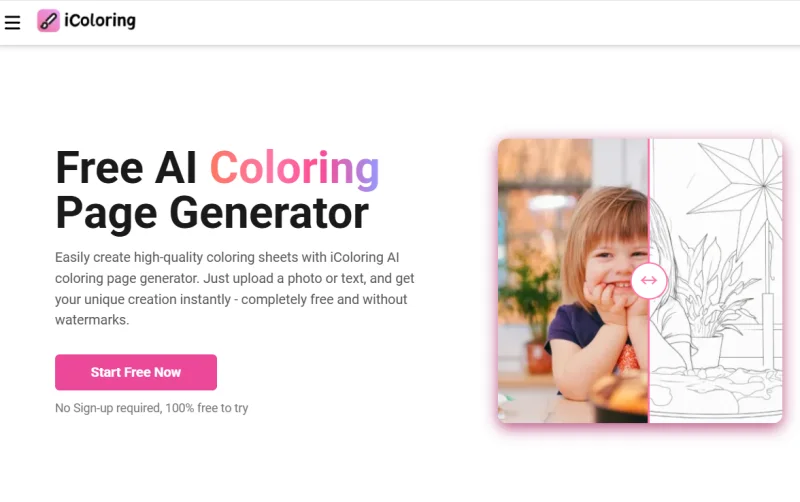
In this guide, we will walk through the entire process of turning your vision into a physical or digital book. We’ll explore how to use a specialized Image to Line Drawing converter to transform complex photos into clean, colorable outlines, and how to assemble them into a cohesive collection that you can print right at home.
Finding Your Theme
Before you dive into the technical tools, every great coloring book needs a theme. A theme gives your book a professional feel and makes it a more thoughtful gift if you’re making it for someone else.
Popular themes include:
- Family Chronicles: Turn holiday photos into coloring pages for the kids.
- Nature and Botany: Focus on garden flowers or local wildlife.
- Architectural Wonders: Use photos of your favorite city landmarks.
- Abstract Mindfulness: Create intricate patterns and mandalas.
Having a clear direction helps you select the right images to process through iColoring later on.
Step 1: Curating and Preparing Your Images
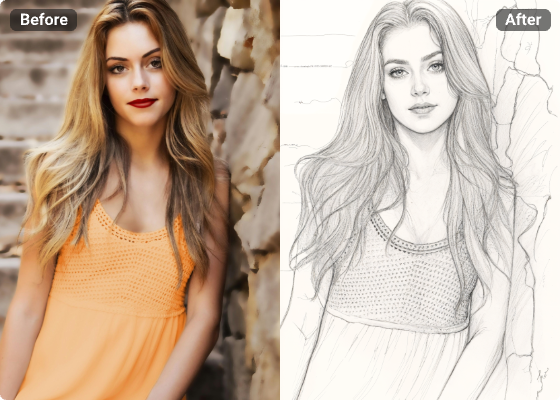
The quality of your final coloring page depends heavily on the source image. When selecting photos, look for high contrast and clear subjects. If a photo is too cluttered, the lines might become confusing once converted.
Once you have your photos, you need a reliable way to strip away the color and shading. This is where the Image to Line Drawing technology comes into play. You don’t need to be a Photoshop expert or a digital artist. Modern AI tools are designed to recognize edges and silhouettes, doing the heavy lifting for you in seconds.
Step 2: Utilizing iColoring for Precision
When you visit iColoring, you’ll find an intuitive interface designed for users of all skill levels. The platform specializes in taking standard images and refining them into “colorable” art.
To get started:
- Upload your chosen image to the site.
- Select the specific conversion settings.
- Preview the result.
The beauty of using a dedicated tool like this is that it eliminates the “gray” areas that often plague DIY conversions. You get crisp, black-and-white lines that look like they were drawn by a professional illustrator.
Step 3: Organizing the Layout
Once you have converted about 15 to 20 images, it’s time to arrange them. You can use free software like Google Slides, Canva, or even Microsoft Word.
- Page Size: Set your document to a standard A4 or Letter size.
- Margins: Leave at least a half-inch margin on all sides. If you plan on binding the book, leave a slightly larger margin (about 0.75 inches) on the left side of each page (the “gutter”).
- Captions and Titles: Consider adding a small caption or a quote at the bottom of each page to give the book more personality.
Step 4: Adding “Filler” Pages
Every professional coloring book includes more than just the art. To make yours feel authentic, add:
- A Title Page: With the name of the book and the “author” (you!).
- A “This Book Belongs To” Page: Great for kids’ books.
- A Test Page: A blank or sparsely decorated page at the back where users can test their markers or colored pencils to see if they bleed through the paper.
Step 5: Printing and Binding
If you are printing at home, the type of paper you choose is crucial. Standard printer paper is often too thin and will wrinkle if used with markers or watercolors. If your printer supports it, try using cardstock or a heavier-weight paper (at least 100gsm).
For binding, you have several free or low-cost options:
- The Three-Ring Binder: Simple and allows you to add or remove pages later.
- Hole Punch and Ribbon: For a rustic, handmade look.
- Staple and Tape: Staple the left edge and cover the staples with decorative Washi tape for a clean finish.
Conclusion
Creating a DIY coloring book is a rewarding project that combines technology with tangible creativity. By using iColoring to handle the complex Image to Line Drawing tasks, you free yourself up to focus on the fun parts—theme, layout, and, of course, coloring!
Scopri di più da GuruHiTech
Abbonati per ricevere gli ultimi articoli inviati alla tua e-mail.