How to Connect to your Linux server from Windows by using PuTTY?

Have you ever controlled Linux server from Windows? No, then I am here to provide a wat connect the Linux server from Windows by using PuTTY. Either you are newbie or experienced the right way to establish SSH connection is here. PuTTY establish SSH connection and manage your server task efficiently and securely through the command line interface from Windows environment.
So, let’s start the process to access Linux server seamlessly from the Windows by using PuTTY.
Prerequisite:
Before connecting to Linux server from PuTTY, complete the following pre-requirements:
Find username and IP address of remote server:
Find the IP address of the Linux server by running command on the terminal
hostname -I
(This is not L this is capital i)
Install PuTTY on your local machine:
If you have earlier and previously version of PuTTY. Consider using the latest version of PuTTY package.
SSH key authentication method:
Use SSH key authentication method to secure the connection, you need to configure the Linux server to accept the SSH key for user authentication. SSH key include public and private key. You can generate SSH key on Windows by using PuTTYgen.
The private key kept secure on your local machine, while public key is shared Linux server. You have to add public key to the “authorized_keys” file on the server. When user connect to server using SSH, then the server verifies the identity by matching the provided SSH key that one stored in “authorized_keys”. This method can enhance the security and protect data form unauthorized access.
Connect to Linux server from Windows:
Using PuTTY to connect to the in Linux server provides a smooth secure method for remote access and management.
Open the PuTTY on your computer system by navigating to Start Menu> All program>PuTTY>PuTTY.
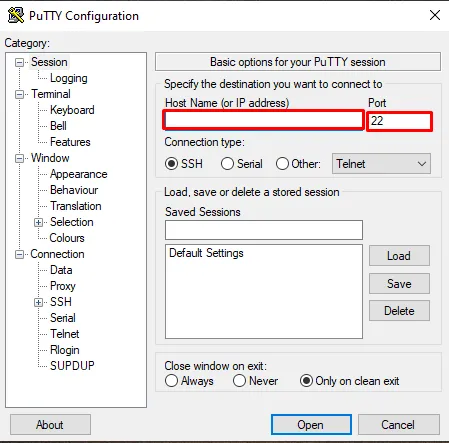
PuTTY configuration Window:
Open the PuTTY configuration Windows, enter the username and IP address of the Linux server in the Hostname section.
Select the connection type to SSH and port number to 22.
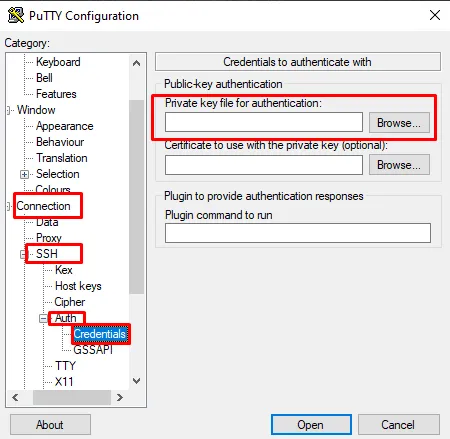
Configure Authentication:
On the category panel navigating to Connection>SSH>Auth>Credentials.
Then Choose the Browse next to private key file authentication. Select the PuTTYgen generated private key file for key pair. Click on the private key file and choose open.
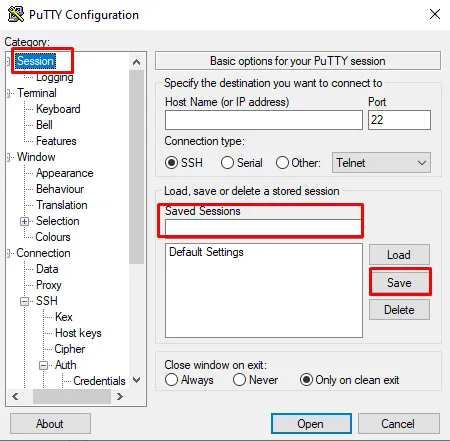
Saving session (Optional):
If you want to connect to Linux server again after the session, you can also save the session for next time. There is no need to enter the information again and again. This can help you to save time.
In the category panel, choose Session. Enter the name in the Saved Session section, then click on Save to save the session.
Establish the connection:
To start the connection, choose Open.
Enter the username and password when prompted. If you are use passphrase during key generation, you must have to enter here to connect to remote server.
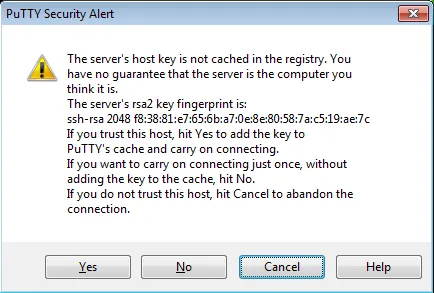
If this is your first time to connect to instance, then you will receive a PuTTY security alert dialog box which shows that server host key in not cached in your registry and say if you trust the host click on Yes. You have to click on Yes.
Now you successfully establish seamlessly SSH connection to Linux server from Windows and complete task through command line interface. User have to use key based authentication for secure connection.
Ti potrebbe interessare:
Segui guruhitech su:
- Google News: bit.ly/gurugooglenews
- Telegram: t.me/guruhitech
- Facebook: facebook.com/guruhitechweb
- Twitter: twitter.com/guruhitech1
- Instagram: instagram.com/guru_hi_tech/
- Threads: threads.net/@guru_hi_tech
- GETTR: gettr.com/user/guruhitech
- Rumble: rumble.com/user/guruhitech
- VKontakte: vk.com/guruhitech
- MeWe: mewe.com/i/guruhitech
- Skype: live:.cid.e496a29c3d8dfd2
- WhatsApp: bit.ly/whatsappguruhitech
Esprimi il tuo parere!
Ti è piaciuto questo articolo? Lascia un commento nell’apposita sezione che trovi più in basso e se ti va, iscriviti alla newsletter.
Per qualsiasi domanda, informazione o assistenza nel mondo della tecnologia, puoi inviare una email all’indirizzo guruhitech@yahoo.com.