
When AI Meets Vector Graphics: A Real-World Test of the SVG Generator
The design world has spent years trying to solve a deceptively simple problem: turning a rough idea into a clean, editable vector graphic without spending hours in Illustrator or hiring a freelancer. Every designer and developer knows the frustration of searching through icon libraries for something that almost fits, or exporting a PNG and pretending the pixelation doesn’t matter.
Then came the wave of AI image generators, but most of them spit out raster images—flat, uneditable, useless for any real production workflow. That’s precisely why the svg generator caught my attention. It promises something different: actual SVG code, with real vector paths, generated from plain English prompts or reference images. No bitmap tracing. No flattened mess. Just clean, editable vectors ready for Figma, React, or whatever tool you throw at them.
Over the past week, I put this tool through its paces across half a dozen real-world design tasks. The goal wasn’t to generate pretty pictures—it was to see whether an AI SVG generator could actually save time in a production workflow. What I found was a tool that understands the difference between a nice-looking image and a usable vector asset, even if it doesn’t always get it right on the first try.
The User Interface That Gets Out of Your Way
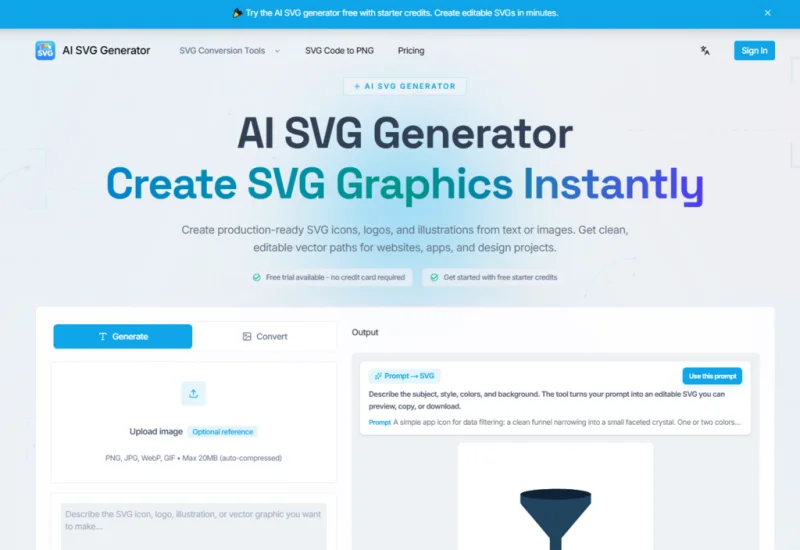
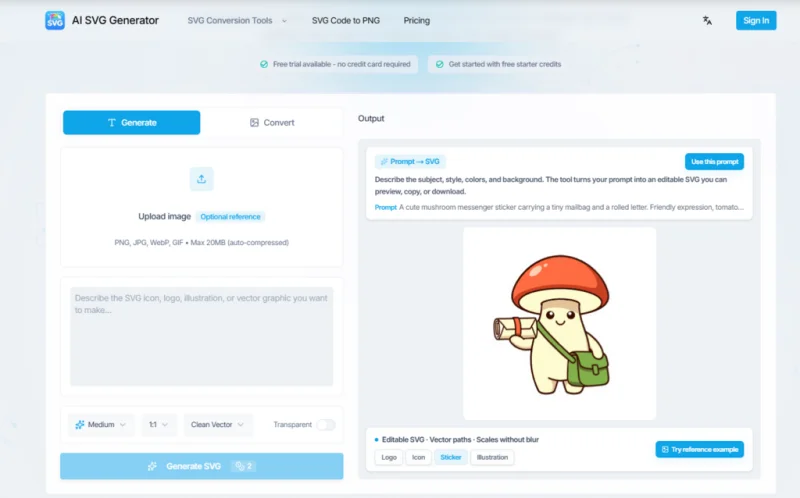
From the moment you land on the page, the interface makes one thing clear: this is built for people who need to get work done, not for people who want to admire a fancy UI. The input area sits front and center, offering two clear paths forward. You can type a description of what you need—subject, style, colors, background, all in natural language—or you can upload a reference image to guide the generation. The image upload supports PNG, JPG, WebP, and GIF up to 20MB, with auto-compression built in so you don’t have to worry about file sizes.
What struck me immediately was the absence of clutter. There’s no overwhelming dashboard, no confusing settings panel, no model selection dropdowns. The tool gives you a prompt box, an image upload option, and a generate button. That’s it. For anyone who has wrestled with over-engineered AI tools, this simplicity feels almost radical. The design philosophy seems to be: let the AI handle the complexity, and let the user focus on what they want to create.
The prompt examples scattered across the page give you a solid starting point. They range from SaaS logo marks and ecommerce icons to coloring pages and Cricut cut files. Each example shows the kind of detail that works well—describing not just what the subject is, but how it should look, feel, and function. A geometric logo mark of an origami compass shell using negative space and a navy, copper, and ivory palette, for instance, gives the AI much more to work with than simply “compass logo”.
How the SVG Generator Actually Works
The workflow follows four straightforward steps, and the entire process takes under ten seconds per generation. Here’s what that looks like in practice.
Step 1: Describe Your Graphic
Natural Language Input for Designers and Developers
The first step is simply writing what you need. The tool accepts natural language descriptions for icons, illustrations, logos, UI elements, diagrams, or even assets meant for handoff to a design team. During my testing, I found that specificity matters enormously. A prompt like “a minimalist coffee cup icon” produced a usable but generic result. A prompt like “a warm-toned coffee cup icon with a steam swirl, 24px line art style, suitable for a food delivery app” generated something much closer to production-ready.
The tool doesn’t require you to learn any special syntax or memorize keywords. You describe the subject, the style, the colors, and the background in plain English, and the AI does the rest. This low learning curve makes it accessible to non-designers while still offering enough control for professionals who know exactly what they want.
Step 2: Generate the SVG
From Text to Editable Vector Paths
This is where the magic happens. The prompt converts into clean, structured SVG code with editable paths instead of a flat bitmap. The output preserves real vector geometry with intact coordinates, which means you can inspect paths, adjust shapes, and keep the vector geometry editable after generation. No bitmap tracing. No pixelation. Just actual SVG markup that you can drop into any vector editing tool.
In my testing, the generation time consistently stayed under ten seconds, which is impressive considering the complexity of some of the prompts I threw at it. The tool builds a first vector draft that you can then refine or regenerate if it doesn’t quite hit the mark.
Step 3: Customize and Refine
Fine-Tuning Without Starting Over
Once the initial SVG generates, you have options. You can fine-tune the style, color, and details of the generated graphic, or regenerate variations to explore different directions. This flexibility is crucial for real-world work, where the first idea rarely matches the final vision. During my testing, I found myself regenerating several times to dial in the right aesthetic—sometimes getting a perfect result on the second try, other times needing four or five iterations to land on something that felt right.
The ability to keep a set visually consistent across multiple generations is particularly valuable for branding or product work. You can generate a logo mark, then generate supporting icons in the same style, maintaining visual coherence without manually adjusting each asset.
Step 4: Export and Use
Production-Ready Code and Files
The final step is getting your SVG out of the tool and into your workflow. You can download the SVG file directly or copy optimized code for your website, app, design tool, or client deliverable. The output works with Figma, Illustrator, Sketch, React, Tailwind CSS, Shopify, Cricut, and Etsy, among others.
What sets this apart from other AI image tools is the quality of the code output. The SVGs come through with clean markup, semantic nodes, proper viewBox settings, and precise anchor points. When I copied an SVG into Figma, the layers preserved their anchor points, stroke weights, and groups—giving me a clean starting point to refine further without rebuilding the asset from scratch. For developers, the optimized React components and raw SVG markup make it easy to ship lightweight web assets directly into product interfaces.
Real-World Testing Across Different Use Cases
To understand whether this tool actually delivers value, I tested it across five distinct scenarios that represent common design needs.
Logo Design for a SaaS Brand
The task: generate a scalable symbol mark for a productivity product, with a modern, tech-forward aesthetic. I prompted with detailed specifications about geometry, negative space, and color palette. The first generation produced something usable but slightly off in proportion.
The second generation nailed the composition, with clean vector paths that scaled perfectly from favicon size to hero section display. So the result was production-ready enough that I could have handed it to a client without embarrassment. The limitation? The tool doesn’t handle typography well—it generated placeholder text that I had to replace manually. For logo marks without text, it’s genuinely useful.
UI Icon Set for a Dashboard
The task: generate a consistent set of 24px line icons for a product dashboard, including analytics, ecommerce cart, and settings icons. I generated each icon individually using similar prompt structures. The consistency across generations was impressive—stroke weights matched, visual language remained coherent, and the SVG code was clean enough to drop directly into a React component library. The time savings here were substantial. Creating a custom icon set from scratch would have taken hours; this took about 15 minutes, including regeneration for a few icons that didn’t quite hit the mark.
Illustration for a Landing Page Hero
The task: generate a flat illustration for a SaaS hero section, with a friendly, approachable aesthetic. This was the most challenging test. The tool produced decent results, but the complexity of multi-element illustrations pushed its limits. The first generation had compositional issues—elements felt disconnected. Subsequent regenerations improved the layout, but I found myself needing to do more manual cleanup in Figma than with simpler assets. The tool handles simple illustrations well but struggles with complex scene compositions that require careful spatial relationships.
Cricut Cut File for a Craft Project
The task: generate a single-layer mandala optimized for cutting workflows. This was a surprising success. The tool generated clean, closed paths with no overlapping issues, which is exactly what you need for vinyl cutting. The output imported cleanly into Cricut Design Space, and the cut paths worked without manual adjustment. For crafters who need custom cut files, this is a genuinely useful capability that would otherwise require significant design skill.
Merch Graphic for a T-Shirt Design
The task: generate a vintage-style print graphic with bold outlines and limited colors for screen printing. The tool delivered a solid base graphic with the right aesthetic, but the color separation wasn’t ideal for screen printing—I had to manually adjust the color palette to ensure clean separation. So the vector paths were clean, though, which made the adjustments straightforward. For merch designers, the tool provides a strong starting point that still requires some manual refinement.
Pricing and Value: What You Actually Pay For
The pricing model is straightforward and avoids the confusing feature-gating that plagues many AI tools. New users get starter credits to try the tool without entering a credit card. From there, you choose between one-time credit packs for occasional use or monthly subscriptions for ongoing work.
The Standard plan runs at $19.9 per month for 100 credits, while the Pro plan costs $39.9 per month for 350 credits. Most generations use between one and four credits, and downloads and exports don’t consume extra credits. What’s notable is that every plan unlocks the full AI engine—there’s no feature gating between tiers. You’re simply paying for more generations, not for access to better capabilities. All plans include commercial usage rights for generated SVGs, which is essential for anyone creating assets for clients or products.
The credit pack model deserves special mention because it addresses a real pain point for freelancers and solo founders. Credits never expire, so you can buy a pack when you need it, generate what you need, and walk away without a recurring bill. This flexibility makes the tool viable for both high-volume production work and occasional one-off projects.
A Balanced Comparison: SVG Generator vs. Traditional Workflows
| Aspect | SVG Generator | Traditional Workflow |
| Learning curve | Minutes to start; natural language input | Steep; requires design software expertise |
| Speed per asset | Under 10 seconds per generation | 15 minutes to several hours per asset |
| Creative control | High through prompt engineering and regeneration | Complete but time-intensive |
| Best for | Rapid prototyping, icon sets, simple illustrations, custom cut files | Complex illustrations, brand identity systems, precision work |
| Output quality | Production-ready for many use cases; may need refinement for complex scenes | Production-ready with full control |
| Cost per asset | Fractions of a cent to a few dollars depending on plan | Freelancer rates of $50–$500+ per asset |
The comparison shows that this tool isn’t trying to replace professional designers—it’s trying to handle the 80% of design work that doesn’t require a specialist’s touch. For the remaining 20%, it provides a starting point that accelerates the professional’s workflow rather than replacing it.
Where It Shines and Where It Stumbles
From a practical user perspective, the tool excels at certain tasks and struggles with others. It’s genuinely impressive for generating icons, logos without text, simple illustrations, stickers, labels, and Cricut cut files. The output quality for these use cases is consistently high enough for production work, especially if you’re willing to regenerate a few times to get the best result.
Where the tool shows its limitations is in complex scene compositions, detailed illustrations with multiple interacting elements, and any scenario requiring precise typography. The AI understands individual elements well but sometimes struggles with how those elements relate to each other spatially. Text generation is particularly weak—it tends to produce placeholder gibberish that you’ll need to replace manually.
The quality of results depends heavily on prompt quality. Vague prompts produce mediocre results; specific, detailed prompts produce much better outputs. This isn’t a failing of the tool—it’s the nature of working with generative AI. But it does mean there’s a learning curve to getting consistently good results, even if the tool itself is easy to start using.
The Real Limitations Worth Knowing
No tool is perfect, and this one has clear boundaries that any honest review should acknowledge. The tool’s performance varies across different types of prompts and image references. Complex scenes may require multiple generations to get right, and there’s no guarantee that a particular prompt will produce the exact result you’re envisioning. The AI sometimes misinterprets ambiguous descriptions, and the results can feel unpredictable until you learn how to craft effective prompts.
The image-to-SVG capability, while useful, doesn’t always preserve the exact composition of the reference image. It interprets the reference rather than tracing it, which means you get a stylized interpretation rather than a direct vectorization. For some workflows, this is exactly what you want; for others, it’s a limitation.
The tool also doesn’t handle gradients, shadows, or complex effects particularly well. It’s optimized for clean, flat vector graphics—the kind that work well in UI design, branding, and print—rather than photorealistic or heavily stylized illustrations. If you need complex visual effects, you’ll likely need to add them in a separate design tool after generation.
Who Should Use This SVG Generator
The tool makes the most sense for specific workflows and user types. Product designers and UI/UX professionals will find it invaluable for rapid prototyping, generating icon sets, and creating consistent visual assets without leaving their design flow. Frontend developers who need custom icons or illustrations but lack design skills can generate production-ready assets directly, reducing dependency on design resources. Small business owners and solo founders can create professional-looking branding assets, social media graphics, and marketing materials without hiring a designer for every small task.
Etsy sellers and crafters who need custom cut files or print graphics can generate unique assets that stand out from the generic templates everyone else uses. Marketing teams can create campaign illustrations and social media assets at scale, maintaining visual consistency across multiple pieces.
What the tool isn’t designed for is replacing professional illustrators for complex, high-detail artwork, or replacing brand identity designers for comprehensive brand systems. It’s a tool that accelerates certain parts of the design process, not a wholesale replacement for design expertise.
The Verdict After Real-World Testing
After a week of pushing this svg generator through real design tasks, the verdict is clear: it’s a genuinely useful tool that delivers on its core promise of turning text and images into editable vector graphics. It’s not magic—it won’t replace skilled designers for complex work, and it requires thoughtful prompting to get great results. But for the vast middle ground of design work—icons, logos, simple illustrations, cut files, UI assets—it saves real time and produces real results.
The pricing model is fair, the commercial rights are clear, and the output quality meets professional standards for many use cases. The tool understands that designers and developers need editable vectors, not pretty pictures, and it delivers on that understanding. For anyone who regularly needs custom vector assets but doesn’t have the time or budget to outsource every request, this tool deserves a spot in your workflow.
The key is knowing when to use it and when to reach for traditional tools. Use it for the 80% of work that benefits from speed and iteration. Use traditional design tools for the 20% that demands precision and complete creative control. Used this way, the SVG generator becomes a powerful accelerator rather than a replacement—and that’s exactly what most production workflows need.
Ti potrebbe interessare:
Segui guruhitech su:
- Google News: bit.ly/gurugooglenews
- Telegram: t.me/guruhitech
- Facebook: facebook.com/guruhitechfb
- Instagram: instagram.com/guruhitech_official/
- X (Twitter): x.com/guruhitech1
- Bluesky: bsky.app/profile/guruhitech.bsky.social
- Rumble: rumble.com/user/guruhitech
- VKontakte: vk.com/guruhitech
- MeWe: mewe.com/i/guruhitech
- Skype: live:.cid.d4cf3836b772da8a
- WhatsApp: bit.ly/whatsappguruhitech
Esprimi il tuo parere!
Ti è stato utile questo articolo? Lascia un commento nell’apposita sezione che trovi più in basso e se ti va, iscriviti alla newsletter.
Per qualsiasi domanda, informazione o assistenza nel mondo della tecnologia, puoi inviare una email all’indirizzo [email protected].
Scopri di più da GuruHiTech
Abbonati per ricevere gli ultimi articoli inviati alla tua e-mail.